jsplumb 入门
简介
jsplumb 是一款绘制有向图(directed graph)的工具, 如流程图、状态图等图表,由于其内部参数精细可控,因此熟悉使用方法后可以更加得心用手的绘制有向图表。
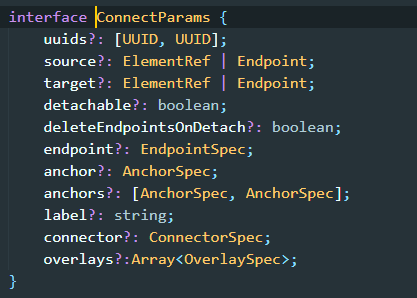
jsplumb 有 2 个版本一个 Toolkit Edition(付费版),另外一个就是 Community Edition(社区版本)。
破解 jsplumb toolkit
访问 demo 地址 下载 tookit 源码, 在源码中找到相关代码如:

全局查找并删除就可以使用了,这种收费的商业 js 库使用时注意, 如果你在大公司偷偷使用的话小心被人家告 !!!
jsplumb 基础概念
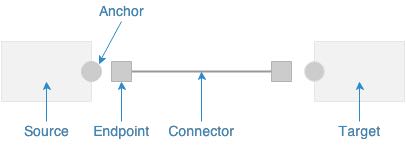
- Souce 源节点(node)
- Target 节点(node)
- Anchor 锚点 位于源节点或者目标节点上
- Endpoint 端点 位于连接线上
- Connector 连接线
- OverLays 连接线上的文字或者符号(箭头)等
Anchor 锚点
锚点定义了两个元素如何进行连接,及 Endpoint(端点)的位置
静态锚点
固定到元素上的某个点,不会移动
[x,y,dx,dy,offsetX,offsetY]
“[0,0]” 表示节点的左上角 x 表示锚点在横轴上的距离,y 表示锚点在纵轴上的距离,这两个值可以从 0 到 1 来设置,0.5 为 center。 而 dx (控制锚的方向) 表示锚点向横轴射出线,dy (控制锚的方向) 表示锚点向纵轴射出线,有 0,-1,1 三个值来设置。0 为不放射线。 offsetX 表示锚点偏移量 x(px),offsetY 表示锚点偏移量 y(px)
anchor:”Bottom” 等于 anchor:[ 0.5, 1, 0, 1 ]
动态锚点
静态锚的集合,就是 jsPlumb 每次连接时选择最合适的锚
[ [0.2,0,0,0],”Top”,”Bottom” ]
边缘锚点
这是一种动态锚的形式,其中锚的位置是从给定形状的周长中选择的。jsPlumb 支持六种形状:Circle、Ellipse、Triangle、Diamond、Rectangle、Square
连续锚点
锚点的位置根据元素与元素之间的方向计算, 如果连接中的两个元素都使用了连续锚,则连续锚的效果最好
Endpoints 端点
Dot 圆点
radius,默认为 10px,定义圆点的半径
cssClass,附加到 Endpoint 创建的元素的 CSS 类
hoverClass,一个 CSS 类,当鼠标悬停在元素或连接的线上时附加到 EndPoint 创建的元素
Rectangle 矩形
width,默认为 20,定义矩形的宽度
height,默认为 20,定义矩形的高度
cssClass,附加到 Endpoint 创建的元素的 CSS 类
hoverClass,当鼠标悬停在元素或连接的线上时附加到 EndPoint 创建的元素
Image 图像
src,必选,指定要使用的图像的 URL
cssClass,附加到 Endpoint 创建的元素的 CSS 类
hoverClass,当鼠标悬停在元素或连接的线上时附加到 EndPoint 创建的元素
Blank 空白
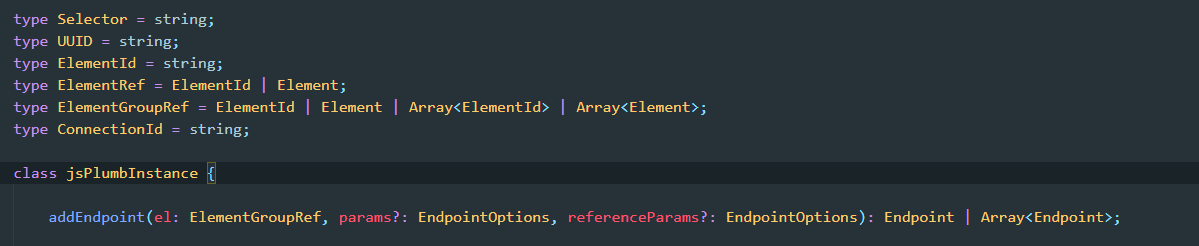
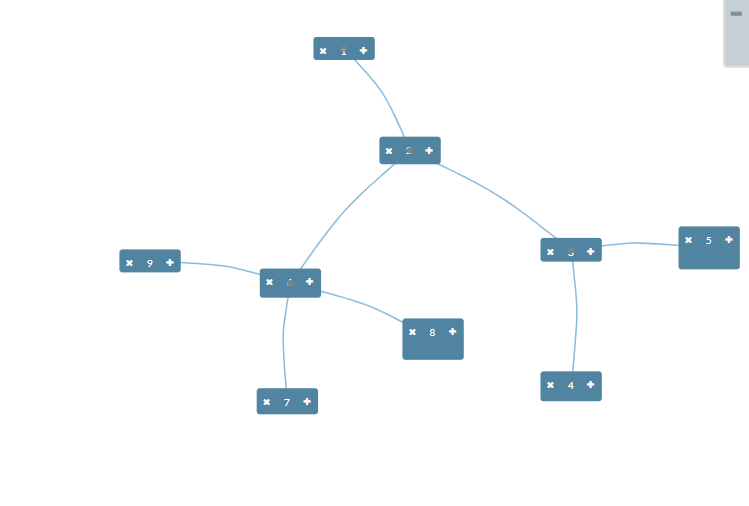
jsplumb 中通过使用 addEndpoint 方法添加锚及端点, 可参考下面的 demo
jsplumb 实例(通过 jsPlumb.getInstance 生成)上 addEndpoint 方法
Connector 连接线
Besier 贝塞尔曲线
它有一个配置项,curviness(弯曲度),默认为 150.这定义了 Bezier 的控制点与锚点的距离
Straight 直线
在两个端点之间绘制一条直线,支持两个配置参数:stub,默认为 0。gap,默认为 0
Flowchart 90 度转角线(流程图)
由一系列垂直或水平段组成的连接。支持四个参数,stub,默认为 30;alwaysRespectStubs,默认为 false;gap,默认为 ;midpoint,默认为 0.5;cornerRadius,默认为 0
State Machine 状态机
支持在同一元素上开始和结束的连接,支持的参数有:margin,默认为 5;curviness,默认为 10;proximityLimit,默认为 80
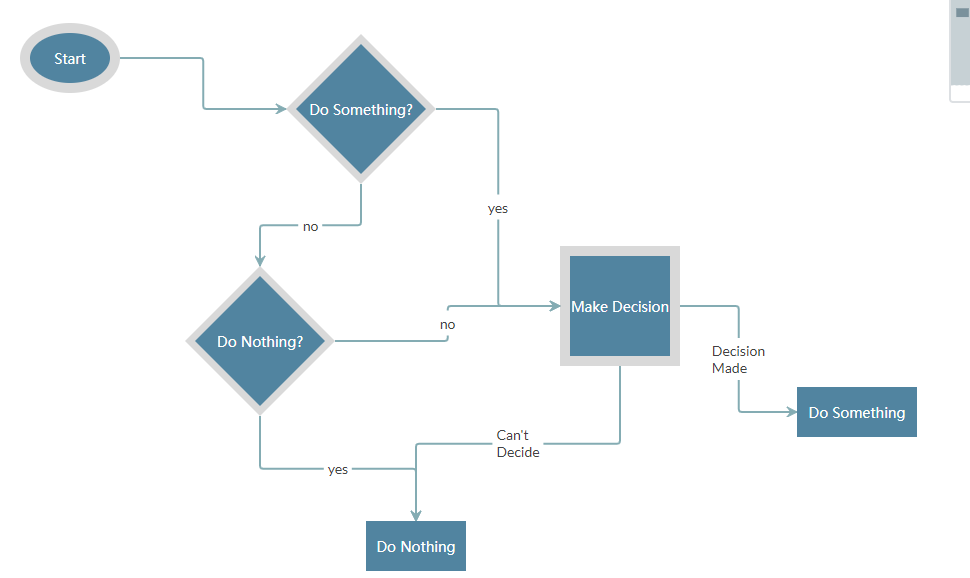
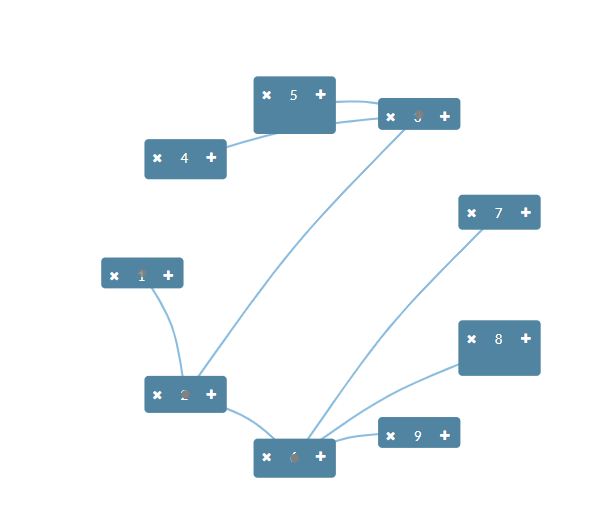
jsplumb 中通过使用 connect 方法添加锚及端点, 可参考下面的 demo
下图为 jsplumb 实例(通过 jsPlumb.getInstance 生成)上 connect 方法

Overlays
Arrow
width,箭头尾部的宽度
length,从箭头的尾部到头部的距离
location,位置,建议使用 0 ~ 1 之间,当作百分比,便于理解
direction,方向,默认值为 1(表示向前),可选-1(表示向后)
foldback,折回,也就是尾翼的角度,默认 0.623,当为 1 时,为正三角
paintStyle,样式对象
Label
label,要显示的文本
cssClass,Label 的可选 css
labelStyle,标签外观的可选参数:font,适应 canvas 的字体大小参数;color,标签文本的颜色;padding,标签的可选填充,比例而不是 px;borderWidth,标签边框的可选参数,默认为 0;borderStyle,颜色等边框参数
location,位置,默认 0.5
PlainArrow
Arrow 的 foldback 为 1 时的例子,参数与 Arrow 相同
Diamand
Arrow 的 foldback 为 2 时的例子,参数与 Arrow 相同
Custom
创建自定义的叠加层
create:function(component) {
      return $("<select id='myDropDown'><option value='foo'>foo</option><option value='bar'>bar</option></select>");
}
jsplumb 中通过使用 connect 方法添加锚及端点, 可参考下面的 demo
jsplumb demo
<div class="panel-body points demo flow_chart" id="points"></div>
import { jsPlumb } from 'jsplumb'
require('../assets/css/demo.css')
require('../assets/css/jsplumb.css')
export default {
name: 'Index',
data() {
return {
data: {
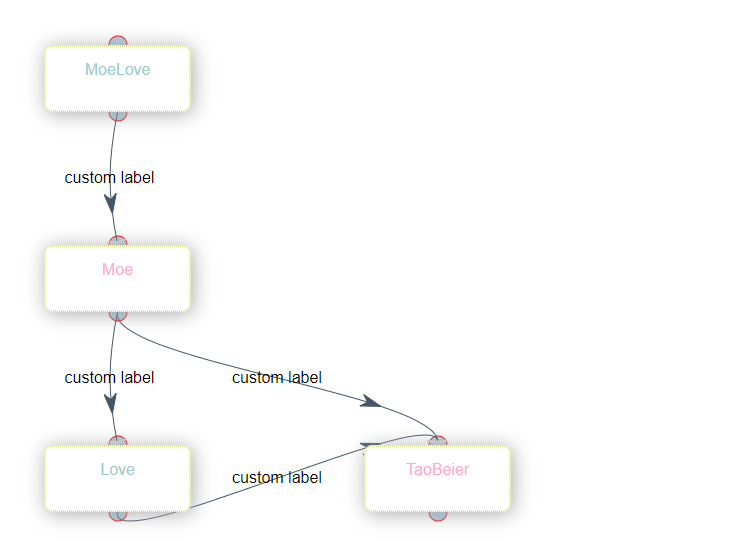
point: [
{
_id: '58c21d713819d56d68763918',
name: 'MoeLove',
status: '0'
},
{
_id: '58c21d803819d56d68763919',
name: 'Moe',
status: '1'
},
{
_id: '58c21da83819d56d6876391a',
name: 'Love',
status: '0'
},
{
_id: '58c63ecf3819d5a22f2c7f24',
name: 'TaoBeier',
status: '1'
}
],
location: [
['Moe', 4, 14],
['Love', 4, 24],
['TaoBeier', 4, 34],
['TaoBeier', 20, 24],
['MoeLove', 4, 4]
],
line: [
['58c21d713819d56d68763918', '58c21d803819d56d68763919'],
['58c21d803819d56d68763919', '58c21da83819d56d6876391a'],
['58c21d803819d56d68763919', '58c63ecf3819d5a22f2c7f24'],
['58c21da83819d56d6876391a', '58c63ecf3819d5a22f2c7f24']
]
}
}
},
methods: {
createFlow(flowData) {
console.log(flowData)
const color = '#acd'
const instance = jsPlumb.getInstance({
Container: 'points',
Connector: ['Bezier', { curviness: 50 }],
Endpoint: ['Dot', { radius: 5 }],
DragOptions: { cursor: 'pointer', zIndex: 5000 },
PaintStyle: { lineWidth: 5, stroke: '#445566' },
EndpointStyle: { radius: 9, fill: color, stroke: 'red' },
HoverPaintStyle: { stroke: '#ec9f2e', lineWidth: 4 },
EndpointHoverStyle: { fill: '#ec9f2e', stroke: '#acd' },
ConnectionOverlays: [
[
'Arrow',
{
location: 1,
id: 'arrow',
length: 4,
foldback: 0.8,
paintStyle: {
lineWidth: 5,
stroke: 'lightgray',
fill: 'lightgray'
}
}
]
]
})
// suspend drawing and initialise.
instance.batch(() => {
// declare some common values:
const arrowCommon = { foldback: 0.7, width: 12 }
// use three-arg spec to create two different arrows with the common values:
const overlays = [
['Arrow', { location: 0.7 }, arrowCommon],
['Label', { label: 'custom label', id: 'label' }]
]
// init point
const points = document.getElementById('points')
flowData.point.forEach(point => {
const div = document.createElement('div')
div.setAttribute('id', `${point._id}`)
div.setAttribute(
'class',
`point chart_act_${point.status} ${point.name}`
)
div.innerText = `${point.name}`
points.appendChild(div)
instance.addEndpoint(
point._id,
{
uuid: `${point._id}-bottom`,
anchor: 'Bottom',
maxConnections: -1
},
{
isSource: true,
isTarget: true
}
)
instance.addEndpoint(
point._id,
{
uuid: `${point._id}-top`,
anchor: 'Top',
maxConnections: -1
},
{
isSource: true,
isTarget: true,
dragAllowedWhenFull: true
}
)
})
// init transition
flowData.line.forEach(line => {
const uuid = [`${line[0]}-bottom`, `${line[1]}-top`]
instance.connect({
uuids: uuid,
overlays
})
})
// init location
flowData.location.forEach(location => {
const item = document.querySelector(`.${location[0]}`)
item.style.left = `${location[1] * 20}px`
item.style.top = `${location[2] * 20}px`
})
})
jsPlumb.fire('jsPlumbDemoLoaded', instance)
}
},
mounted() {
jsPlumb.ready(() => {
this.createFlow(this.data)
})
}
}
jsplumbtoolkit 初始化流程
引入 jsplumbtoolkit.js 后, 在 jsPlumbToolkit.ready 函数内部调用
jsPlumbToolkit.ready(() => {
  // ...
})
const toolkit = jsPlumbToolkit.newInstance({})
加载数据
// 方式一
const toolkit = jsPlumbToolkit.newInstance({
  data: [
    ('nodes': [{ id: 'foo', name: 'foo' }, { id: 'bar', name: 'bar' }]),
    ('edges': [{ source: 'foo', target: 'bar' }])
  ]
})
// 方式二
// 先声明 tookit, 使用
toolkit.load({
  data:[ .... ]
})
渲染数据
container 指定加载容器
const renderer = toolkit.render({
  container: 'id',
  jsPlumb: {}
})
jsPlumb 选项可以配置图表中 节点 锚点 连接线等,最终和 jsPlumb 的默认配置合并到一起。
toolkit 中相关定义
Layouts
jsplumb 只能通过使用 css 定制 node 节点的位置,但 toolkit 内置了几种布局方式可供使用,默认使用绝对布局,在节点 data 中设置 left 及 top 属性决定其定位,用户决定节点位置的应用程序,绝对布局是一个不错的选择。如果需要呈现一个陌生的数据集可以使用 Spring layout, 该布局方法通过动态计算设置 left top 值已呈现最好的展示效果。
- Absolute Layout
- Balloon Layout
- Spring Layout
- Circular Layout
- Hierarchical Layout
Nodes
在 jsplumb 中 node 是一个个 dom 节点, 需要手动书写 dom 节点或通过 js 批量添加节点,在 tookit 中可以使用其内置的模板引擎批量生成节点。
简单示例如下:
此页面设置的动态字段均为 data nodes 数组每一个对象包含的属性
<script type="jtk" id="tmplNode">
  <div>
    <div class="left">
      <img style="width:40px;height:40px;" src="${picUrl}"/>
      <div class="node-name">${name}</div>
    </div>
    <r-if test="tips">
      <ul class="right">
        <r-each in="tips">
          <li>${$data}</li>
        </r-each>
      </ul>
    </r-if>
  </div>
</script>
jsPlumbToolkit.ready(() => {
  const tookit = jsPlumbToolkit.newInstance()
  const data = {
    nodes: [
      {
        id: '1',
        picUrl: 'http://xxx.png',
        name: 'xxx',
        tips: ['xxxx', '555555']
      }
    ]
  }
  const renderer = tookit.load({ type: 'json', data }).render({
    // ...
    view: {
      nodes: {
        default: {
          template: 'tmplNode'
        }
      }
    }
    // ...
  })
})
上例中如果在 data 数组元素属性 type 为空默认采用 default 模板, 如果 type 中有值则采用 view 中额外配置的模板
<script type="jtk" id="tmplNode">
  <div>
    <div class="left">
      <img style="width:40px;height:40px;" src="${picUrl}"/>
      <div class="node-name">${name}</div>
    </div>
    <r-if test="tips">
      <ul class="right">
        <r-each in="tips">
          <li>${$data}</li>
        </r-each>
      </ul>
    </r-if>
  </div>
</script>
<script type="jtk" id="tmplNode2">
  <div>
    <div class="left">
      <div class="node-name">${name}</div>
    </div>
  </div>
</script>
jsPlumbToolkit.ready(() => {
  const tookit = jsPlumbToolkit.newInstance()
  const data = {
    nodes: [
      {
        id: '1',
        picUrl: 'http://xxx.png',
        name: 'xxx',
        tips: ['xxxx', '555555']
      },
      {
        id: '2',
        picUrl: 'http://xxx.png',
        name: 'xxx',
        tips: ['xxxx', '555555'],
        type: 'common'
      }
    ]
  }
  const renderer = tookit.load({ type: 'json', data }).render({
    // ...
    view: {
      nodes: {
        default: {
          template: 'tmplNode',
          events: {
            click: params => {
              console.log(params)
            }
          }
        },
        common: {
          template: 'tmplNode2',
          parent: 'default'
        }
      }
    }
    // ...
  })
})
view 中可以添加的属性
- parent: nodes 中的 key 可以继承其定义的属性
- template:模板
- events:定义 node 事件
- dragOptions: 拖拽设置
同时 nodes 中生成的节点是 dom, 我们可以通过书写 css 样式控制其展现,灵活性上会提高很多
Edges
在 jsplumb 中通过使用 connect 方法将节点之间连接起来, 但在 tookit 中可以通过 edges 属性配置节点与节点的关系
<script type="jtk" id="tmplNode">
  <div>
    <div class="left">
      <img style="width:40px;height:40px;" src="${picUrl}"/>
      <div class="node-name">${name}</div>
    </div>
    <r-if test="tips">
      <ul class="right">
        <r-each in="tips">
          <li>${$data}</li>
        </r-each>
      </ul>
    </r-if>
  </div>
</script>
jsPlumbToolkit.ready(() => {
  const tookit = jsPlumbToolkit.newInstance()
  const data = {
    nodes: [
      {
        id: '1',
        picUrl: 'http://xxx.png',
        name: 'xxx1',
        tips: ['xxxx', '555555']
      },
      {
        id: '2',
        picUrl: 'http://xxx.png',
        name: 'xxx2',
        tips: ['xxxx', '555555']
      }
    ],
    edges: [{ source: '1', target: '2' }]
  }
  const renderer = tookit.load({ type: 'json', data }).render({
    // ...
    view: {
      nodes: {
        default: {
          template: 'tmplNode'
        }
      },
      edges: {
        connector: 'StateMachine',
        paintStyle: { lineWidth: 2, strokeStyle: '#CCC' }
      }
    }
    // ...
  })
})
view 中 edges 可以添加的属性除了 jsplumb 对 connector 参数其也支持以下参数
- parent:view edges 中的 key 可以继承其定义的属性
- connector:jsplumb 中连接线的类型
- paintStyle:样式颜色等
- hoverPaintStyle: 样式颜色等
- events: 定义 edge 事件
- label:可以使用此配置定义静态动态的 label
- labelLocationAttribute: label 位置
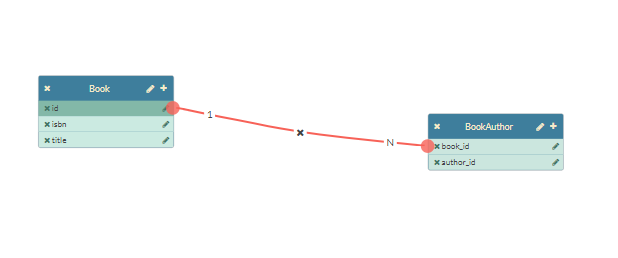
Ports
端口的概念与 jsPlumb 中的端点概念是相同的。如:希望描述数据库中表与表指点的关系, 需要数据字段(列)完成, 节点表示表,端口表示列。
view 中 ports 可以添加的属性 ,除了 jsplumb 对 endpoint 参数其也支持以下参数
- parent ports 中的 key 可以继承其定义的属性
- template 模板
- edgeType 如果正触发拖拽动作时显示的 edge 的类型
- maxConnections 最大连接数默认为 1 , 设置为 -1 时表示不限制连接
- isSource 默认为 false 如果为 true 表示该 port 是起始点
- isTarget 默认为 false 如果为 true 表示该 port 是终止点
- isEndpoint 默认为 false 如果为 true 则可以使用 jsplumb 调用方法触发连接
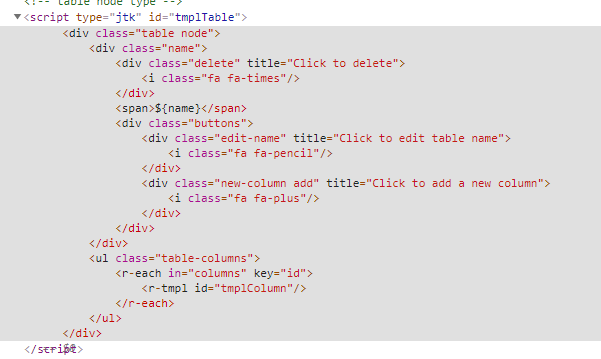
下面的示例中 ports 数据具体体现在节点 nodes 中 columns 属性上, 注意 table 模板列的引用
jsPlumbToolkit.ready(() => {
  const tookit = jsPlumbToolkit.newInstance()
  const data = {
    nodes: [
      {
        id: 'book',
        name: 'Book',
        type: 'table',
        columns: [
          {
            id: 'id',
            datatype: 'integer',
            primaryKey: true
          },
          {
            id: 'isbn',
            datatype: 'varchar'
          },
          {
            id: 'title',
            datatype: 'varchar'
          }
        ]
      },
      {
        id: 'book_author',
        name: 'BookAuthor',
        type: 'table',
        columns: [
          {
            id: 'book_id',
            datatype: 'integer'
          },
          {
            id: 'author_id',
            datatype: 'integer'
          }
        ]
      }
    ],
    edges: [
      {
        source: 'book.id',
        target: 'book_author.book_id',
        data: {
          type: '1:1'
        }
      },
      {
        source: 'author.id',
        target: 'book_author.author_id',
        data: {
          type: '1:1'
        }
      }
    ]
  }
  const renderer = tookit.load({ type: 'json', data }).render({
    // ...
    view: {
      nodes: {
        default: {
          template: 'tmplTable',
          events: {
            click: params => {
              console.log(params)
            }
          }
        }
      },
      edges: {
        common: {
          anchor: ['Left', 'Right'], // anchors for the endpoints
          connector: 'StateMachine', //  StateMachine connector type
          events: {
            dbltap: function(params) {
              _editEdge(params.edge)
            }
          },
          overlays: [
            [
                events: {
                  tap: function(params) {
                    toolkit.removeEdge(params.edge)
                  }
                }
              }
            ]
          ]
        },
        // each edge type has its own overlays.
        '1:1': {
          parent: 'common',
          overlays: [
            ['Label', { label: '1', location: 0.1 }],
            ['Label', { label: '1', location: 0.9 }]
          ]
        }
      },
      ports: {
        default: {
          template: 'tmplColumn',
          edgeType: 'common', // the type of edge for connections from this port type
          maxConnections: -1, // no limit on connections
          events: {
            dblclick: function() {
              console.log(arguments)
            }
          }
        }
      }
    }
    // ...
  })
})
Groups
包含在某个其他元素中的一组元素,可以折叠,导致与所有组成员的连接被合并到折叠的组容器上。

var toolkit = jsPlumbToolkit.newInstance()
toolkit.load({
  data: {
    groups: [
      { id: 'g1', type: 'groupType1' },
      { id: 'g2', type: 'groupType1' }
    ],
    nodes: [
      { id: '1', group: 'g1' },
      { id: '2', group: 'g1' },
      { id: '3', group: 'g2' },
      { id: '4', group: 'g2' }
    ],
    edges: [
      { source: '1', target: '2' },
      { source: '1', target: '3' },
      { source: '4', target: '3' },
      { source: '4', target: '2' }
    ]
  }
})
toolkit.render({
  // ...
  view: {
    nodes: {
      default: {
        template: 'tmplNode',
        events: {
          click: function(p) {
            alert('You clicked on node ' + p.node.id)
          }
        }
      }
    },
    groups: {
      groupType1: {
        template: 'tmplGroupType1',
        constrain: true
      }
    }
  }
})
可以配置的属性如下:
- droppable 默认为 true node 可以拖进 group 中
- constrain 默认为 false node 可以拖出 group 中
- revert 默认为 true 在拖拽时如果没有拖拽到另一个组中 取消拖拽则会回到本组的原来位置
- prune 默认为 false
- orphan 默认为 false
- dropOverride 默认为 false
QA
<div class="jtk-demo-main" id="jtk-demo-layouts">
  <-- 容器 -->
  <div class="jtk-demo-canvas canvas-wide jtk-surface">
    <div class="controls">
      <-- 自适应按钮-->
      <i class="el-icon-s-home" reset="" title="自适应"></i>
      <-- 全屏按钮-->
      <i class="el-icon-full-screen" full="" title="全屏按钮"></i>
    </div>
    <-- 小地图-->
    <div class="miniview jtk-miniview"></div>
  </div>
</div>
jsPlumbToolkit.ready(() => {
  const tookit = jsPlumbToolkit.newInstance({
    // 禁止拖拽
    beforeStartDetach() {
      return false
    }
  })

  const data = [
    // ...
  ]

  const mainElement = document.querySelector('#jtk-demo-layouts')
  // 容器
  const canvasElement = mainElement.querySelector('.jtk-demo-canvas')
  // 小地图
  const miniviewElement = mainElement.querySelector('.miniview')
  // 按钮
  const controls = document.querySelector('.controls')
})
容器设置
const renderer = tookit.load({ type: 'json', data: this.data }).render({
  container: canvasElement
  // ...
})
缩放及小地图
const renderer = tookit.load({ type: 'json', data: this.data }).render({
  miniview: {
    container: miniviewElement
  }
})
全屏
点击全屏按钮,触发 dialog , 在 dialog 渲染新的实例
详细的交互,线,图标可点击
图标点击
const renderer = tookit.load({ type: 'json', data: this.data }).render({
  //...
  view: {
    nodes: {
      default: {
        //...
        events: {
          click: params => {
            console.log(params)
          }
        }
      }
    }
  }
})
线点击
const renderer = tookit.load({ type: 'json', data: this.data }).render({
  //...
  view: {
    edges: {
      default: {
        //...
        events: {
          click: params => {
            console.log(params)
          }
        }
      }
    }
  }
})
自适应显示
初始化时
const renderer = tookit.load({ type: 'json', data: this.data }).render({
  zoomToFit: true
})
点击全屏按钮时
const renderer = jsPlumb.on(mainElement, 'tap', '[reset]', function() {
  toolkit.clearSelection()
  renderer.zoomToFit()
})
避免拖拽时产生重叠
const renderer = tookit.load({ type: 'json', data: this.data }).render({
  dragOptions: {
    magnetize: true
  }
})
拖拽设置
默认节点是可以进行拖拽的, 通过设置 elementsDraggable 阻止拖拽
const renderer = tookit.load({ type: 'json', data: this.data }).render({
  elementsDraggable: false
})
缩放设置
默认是可以进行缩放的, tookit 其内部提供了很多方法
平移设置
默认是可以进行平移的,通过设置 elementsDraggable 阻止平移
var renderer = toolkit.render({
  enablePan: false
})
或
renderer.setMode(Surface.DISABLED)